Different colors for selected tab in BottomNavigationView in Android Kotlin(Programmatically)

Many times we need to use different colors for the selected tab in BottomNavigationView, displayed in the picture below.

Different colors for selected tab in BottomNavigationView in Android

Currently you can set only on color for selected tab from xml layout like this, using these 2 properties: app:itemIconTint and app:itemTextColor

<com.google.android.material.bottomnavigation.BottomNavigationView
  android:id="@+id/bnv"
  android:layout_width="0dp"
  android:layout_height="wrap_content"
  android:background="@android:color/white"
  app:itemIconTint="@color/color_bnv1"
  app:itemTextColor="@color/color_bnv1"
  app:labelVisibilityMode="labeled"
  app:layout_constraintBottom_toBottomOf="parent"
  app:layout_constraintEnd_toEndOf="parent"
  app:layout_constraintStart_toStartOf="parent"
  app:menu="@menu/menu_bottom_navigation_view" />

Here you can see we use @color/color_bnv1 for both property which is a color state selector from res/color directory. Here is the implementation for that.

<!-- res/color/color_bnv1.xml -->
<?xml version="1.0" encoding="utf-8"?>
<selector xmlns:android="http://schemas.android.com/apk/res/android">
  <item android:color="@color/colorTab1" android:state_checked="true" />
  <!-- @color/colorTab1 = #006064 //define this in your res/values/color.xml or change the color directly here -->
  <item android:color="@android:color/darker_gray" android:state_checked="false" />
</selector>

Now for the above code, you see the result like this,

BottomNavigationView in Android

Now we need to apply different app:itemIconTint and app:itemTextColor when each tab is selected. So we apply both of these properties to the BottomNavigationView programmatically at runtime in our activity file in Kotlin.

For that we need use setOnNavigationItemSelectedListener from BottomNavigationView, which will give us the event when any tab is selected by user.

bnv.setOnNavigationItemSelectedListener {
  when (it.itemId) {
    R.id.action_tab1 -> {
      
    }
    R.id.action_tab2 -> {
      
    }
    R.id.action_tab3 -> {
      
    }
  }
  true
}

We will use the same file @color/color_bnv1 here. But here, we need to create 3 such different files for the colors we need. So we will create @color/color_bnv2 and @color/color_bnv3 in res/color, which should looks like this.

<!-- res/color/color_bnv2.xml -->
<?xml version="1.0" encoding="utf-8"?>
<selector xmlns:android="http://schemas.android.com/apk/res/android">
  <item android:color="@color/colorTab2" android:state_checked="true" />
  <!-- @color/colorTab2 = #BF360C //define this in your res/values/color.xml or change the color directly here -->
  <item android:color="@android:color/darker_gray" android:state_checked="false" />
</selector>
<!-- res/color/color_bnv3.xml -->
<?xml version="1.0" encoding="utf-8"?>
<selector xmlns:android="http://schemas.android.com/apk/res/android">
  <item android:color="@color/colorTab3" android:state_checked="true" />
  <!-- @color/colorTab3 = #4A148C //define this in your res/values/color.xml or change the color directly here -->
  <item android:color="@android:color/darker_gray" android:state_checked="false" />
</selector>

Now here we will set both properties using its Kotlin syntax which is itemIconTintList and itemTextColor for BottomNavigationView. We use the same @color/color_bnv1, @color/color_bnv2 and @color/color_bnv3 for each of the tab selected.

bnv.setOnNavigationItemSelectedListener {
  when (it.itemId) {
    R.id.action_tab1 -> {
      tv.text = getString(R.string.str_bnv_tab1) //"Tab 1"
      tv.setTextColor(ContextCompat.getColor(this, R.color.colorTab1))
      bnv.itemIconTintList = ContextCompat.getColorStateList(this, R.color.color_bnv1)
      bnv.itemTextColor = ContextCompat.getColorStateList(this, R.color.color_bnv1)
    }
    R.id.action_tab2 -> {
      tv.text = getString(R.string.str_bnv_tab2) //"Tab 2"
      tv.setTextColor(ContextCompat.getColor(this, R.color.colorTab2))
      bnv.itemIconTintList = ContextCompat.getColorStateList(this, R.color.color_bnv2)
      bnv.itemTextColor = ContextCompat.getColorStateList(this, R.color.color_bnv2)
    }
    R.id.action_tab3 -> {
      tv.text = getString(R.string.str_bnv_tab3) //"Tab 3"
      tv.setTextColor(ContextCompat.getColor(this, R.color.colorTab3))
      bnv.itemIconTintList = ContextCompat.getColorStateList(this, R.color.color_bnv3)
      bnv.itemTextColor = ContextCompat.getColorStateList(this, R.color.color_bnv3)
    }
  }
  true
}

When the user opens the app for the first time, you can use the following code that will preselect the desired tab and will execute the listener for that.

bnv.selectedItemId = R.id.action_tab1

You can find the whole code in my github repo: https://github.com/dakshbhatt21/a-computer-engineer

Populate and manipulate AutoCompleteTextView in Android

If you ever encounter AutoCompleteTextView in your Android project, you must have had the following questions in your mind.
– How to provide data for AutoCompleteTextView
– How to design row item for AutoCompleteTextView
– How to check which item selected in AutoCompleteTextView
– How to populate AutoCompleteTextView from an array of data class without implementing an adapter
– How to change search(filter) preferences
– etc…

In this tutorial, I will answer all your questions.

Here we use Kotlin language for creating this example.
First of all, we will create the layout for the AutoCompleteTextView.

<androidx.constraintlayout.widget.ConstraintLayout xmlns:android="http://schemas.android.com/apk/res/android"
  xmlns:app="http://schemas.android.com/apk/res-auto"
  xmlns:tools="http://schemas.android.com/tools"
  android:layout_width="match_parent"
  android:layout_height="match_parent"
  android:paddingLeft="@dimen/activity_horizontal_margin"
  android:paddingTop="@dimen/activity_vertical_margin"
  android:paddingRight="@dimen/activity_horizontal_margin"
  android:paddingBottom="@dimen/activity_vertical_margin"
  tools:context="com.acomputerengineer.AutoCompleteTextViewActivity">
  
  <com.google.android.material.textfield.TextInputLayout
    android:id="@+id/til"
    android:layout_width="0dp"
    android:layout_height="wrap_content"
    app:layout_constraintEnd_toEndOf="parent"
    app:layout_constraintStart_toStartOf="parent"
    app:layout_constraintTop_toTopOf="parent">

    <AutoCompleteTextView
      android:id="@+id/actv"
      android:layout_width="match_parent"
      android:layout_height="wrap_content"
      android:hint="@string/your_hint_here"
      android:inputType="text"
      android:maxLines="1" />
  </com.google.android.material.textfield.TextInputLayout>

</androidx.constraintlayout.widget.ConstraintLayout>

Now we will see 3 different cases for AutoCompleteTextView.

First Case
Here we use array of strings to populate AutoCompleteTextView and display list.

First, we will create the list of movies as a string array and display it in AutoCompleteTextView using the default ArrayAdapter.

val movies = arrayOf("Avengers: Endgame", "Captain Marvel", "Shazam!", "Spider-Man: Far From Home", "Dark Phoenix", "Hellboy", "Glass", "Reign of the Superman", "Brightburn")
val adapter1 = ArrayAdapter(this, android.R.layout.select_dialog_item, movies)

//actv is the AutoCompleteTextView from your layout file
actv.threshold = 1 //start searching for values after typing first character
actv.setAdapter(adapter1)

Here is the result:

AutoCompleteTextView in Android

Second Case
Here we use an array of a custom object of data class to populate AutoCompleteTextView and display list.
We will create the list of movies as a Movie data class array and display it in AutoCompleteTextView using the default ArrayAdapter. The ArrayAdapter uses “toString()” method of a data class if there is data class array provided.

So first we will create a data class named Movie.

data class Movie(
  val name: String,
  val year: Int
) {
  override fun toString(): String {
    return name.plus(" - ").plus(year)
  }
}

Now we will create the adapter and set it to the AutoCompleteTextView.

val movieObjects = arrayOf(Movie("Avengers: Endgame", 2019), Movie("Captain Marvel", 2019), Movie("Shazam!", 2019), Movie("Spider-Man: Far From Home", 2019), Movie("Dark Phoenix", 2019), Movie("Hellboy", 2019), Movie("Glass", 2019), Movie("Reign of the Superman", 2019), Movie("Brightburn", 2019))
val adapter2 = ArrayAdapter(this, android.R.layout.select_dialog_item, movieObjects)

//actv is the AutoCompleteTextView from your layout file
actv.threshold = 1 //start searching for values after typing first character
actv.setAdapter(adapter2)

Here is the result:

AutoCompleteTextView in Android

Now in both above case, you may have noticed that the design for the row is single text line provided in ‘android.R.layout.select_dialog_item’ layout. If we want to create a custom layout, we need to create a custom ArrayAdapter and inflate our layout there.

You may also have noticed that here when I type “ma”, it only displays one result “Captain Marvel” because the default filter uses “startsWith()” function so it only selects the result which has words start with “ma”. So to check in the whole string, we need to create a custom filter in the ArrayAdapter. So let’s see that.

Third Case
Here first we create an adapter that extends ArrayAdapter and in that we will inflate our custom layout and also add logic for our filter method.

class AutoCompleteTextViewAdapter(private val c: Context, @LayoutRes private val layoutResource: Int, private val movies: Array<AutoCompleteTextViewActivity.Movie>) :
  ArrayAdapter<AutoCompleteTextViewActivity.Movie>(c, layoutResource, movies) {

  var filteredMovies: List<AutoCompleteTextViewActivity.Movie> = listOf()

  override fun getCount(): Int = filteredMovies.size

  override fun getItem(position: Int): AutoCompleteTextViewActivity.Movie = filteredMovies[position]

  override fun getView(position: Int, convertView: View?, parent: ViewGroup?): View {
    val view = convertView ?: LayoutInflater.from(c).inflate(layoutResource, parent, false)

    view.tvMovieName.text = filteredMovies[position].name
    view.tvMovieYear.text = filteredMovies[position].year.toString()

    return view
  }

  override fun getFilter(): Filter {
    return object : Filter() {
      override fun publishResults(charSequence: CharSequence?, filterResults: FilterResults) {
        @Suppress("UNCHECKED_CAST")
        filteredMovies = filterResults.values as List<AutoCompleteTextViewActivity.Movie>
        notifyDataSetChanged()
      }

      override fun performFiltering(charSequence: CharSequence?): FilterResults {
        val queryString = charSequence?.toString()?.toLowerCase()

        val filterResults = FilterResults()
        filterResults.values = if (queryString == null || queryString.isEmpty())
            movies.asList()
          else
            movies.filter {
              it.name.toLowerCase().contains(queryString) || it.year.toString().contains(queryString)
            }
        return filterResults
      }
    }
  }
}

Here is the layout for this adapter “item_auto_complete_text_view.xml”

<androidx.constraintlayout.widget.ConstraintLayout xmlns:android="http://schemas.android.com/apk/res/android"
  xmlns:app="http://schemas.android.com/apk/res-auto"
  android:layout_width="match_parent"
  android:layout_height="match_parent"
  android:paddingLeft="@dimen/activity_horizontal_margin"
  android:paddingTop="@dimen/activity_vertical_margin"
  android:paddingRight="@dimen/activity_horizontal_margin"
  android:paddingBottom="@dimen/activity_vertical_margin">

  <TextView
    android:id="@+id/tvMovieName"
    android:layout_width="0dp"
    android:layout_height="wrap_content"
    app:layout_constraintEnd_toEndOf="parent"
    app:layout_constraintStart_toStartOf="parent"
    app:layout_constraintTop_toTopOf="parent" />

  <TextView
    android:id="@+id/tvMovieYear"
    android:layout_width="0dp"
    android:layout_height="wrap_content"
    android:layout_marginTop="5dp"
    app:layout_constraintEnd_toEndOf="parent"
    app:layout_constraintStart_toStartOf="parent"
    app:layout_constraintTop_toBottomOf="@id/tvMovieName" />

</androidx.constraintlayout.widget.ConstraintLayout>

Now we use this adapter.

val movieObjects = arrayOf(Movie("Avengers: Endgame", 2019), Movie("Captain Marvel", 2019), Movie("Shazam!", 2019), Movie("Spider-Man: Far From Home", 2019), Movie("Dark Phoenix", 2019), Movie("Hellboy", 2019), Movie("Glass", 2019), Movie("Reign of the Superman", 2019), Movie("Brightburn", 2019))
val adapter3 = AutoCompleteTextViewAdapter(this,  R.layout.item_auto_complete_text_view, movieObjects1)

//actv is the AutoCompleteTextView from your layout file
actv.threshold = 1 //start searching for values after typing first character
actv.setAdapter(adapter3)

See the result here:

AutoCompleteTextView in Android

Here you can see we have a custom layout where we have name and year below that. You also notice one thing that we now have all the result which contains string “ma” in the result. Because we use “contains()” function in our filter in the adapter.

Now we will see the listeners for AutoCompleteTextView which helps us to determine if the user selects any result from the suggestion or type any new text.

actv.setOnItemClickListener { adapterView, view, i, l ->
  val movie = adapterView.getItemAtPosition(i)
  //for adapter2 and adapter3
  if (movie is Movie) {
    Toast.makeText(this, "Selected item: ".plus(movie.name), Toast.LENGTH_LONG).show()
  }
  //for adapter1
  else if (movie is String) {
    Toast.makeText(this, "Selected item: ".plus(movie), Toast.LENGTH_LONG).show()
  }
}

Here you can check if the item is selected or not from the suggestions. You can also implement TextWatcher in the AutoCompleteTextView to check if the value is edited or not.

You can find the whole code in my github repo: https://github.com/dakshbhatt21/a-computer-engineer

Open chat page in Whatsapp for given number in Android

You can use this functionality of opening any Whatsapp number from your Android app for contact us page or in the send us feedback page. You can set your number in the code and when the user taps on the contact us button, feedback button or any other button, they will redirect to the Whatsapp app with your chat page open. So they can type and send message to you directly.

Open chat page in Whatsapp for given number

Now we will see the code for that. From now on we will use the Kotlin as our primary language.

First, we will see the layout where you can enter the phone number of the user with the country code. And then press the button to open the Whatsapp app.

<androidx.constraintlayout.widget.ConstraintLayout xmlns:android="http://schemas.android.com/apk/res/android"
  xmlns:app="http://schemas.android.com/apk/res-auto"
  xmlns:tools="http://schemas.android.com/tools"
  android:layout_width="match_parent"
  android:layout_height="match_parent"
  android:paddingLeft="@dimen/activity_horizontal_margin"
  android:paddingTop="@dimen/activity_vertical_margin"
  android:paddingRight="@dimen/activity_horizontal_margin"
  android:paddingBottom="@dimen/activity_vertical_margin"
  tools:context="com.acomputerengineer.OpenWhatsappNumberActivity">

  <EditText
    android:id="@+id/et"
    android:layout_width="0dp"
    android:layout_height="wrap_content"
    android:hint="@string/enter_phone_number"
    app:layout_constraintEnd_toEndOf="parent"
    app:layout_constraintStart_toStartOf="parent"
    app:layout_constraintTop_toTopOf="parent" />

  <Button
    android:id="@+id/btn"
    android:layout_width="0dp"
    android:layout_height="wrap_content"
    android:text="@string/open_in_whatsapp"
    app:layout_constraintEnd_toEndOf="parent"
    app:layout_constraintStart_toStartOf="parent"
    app:layout_constraintTop_toBottomOf="@id/et" />

</androidx.constraintlayout.widget.ConstraintLayout>

Now we will see the Kotlin code for that.

btn.setOnClickListener {
  val phoneNumber = et.text.toString()
  val url = "https://api.whatsapp.com/send?phone=$phoneNumber"
  try {
    packageManager.getPackageInfo("com.whatsapp", PackageManager.GET_ACTIVITIES)
    val i = Intent(Intent.ACTION_VIEW)
    i.data = Uri.parse(url)
    startActivity(i)
  } catch (e: PackageManager.NameNotFoundException) {
    Toast.makeText(this, "Whatsapp is not installed in your phone.", Toast.LENGTH_SHORT).show()
    e.printStackTrace()
  }
}

Github repository link: https://github.com/dakshbhatt21/a-computer-engineer

Display image grid in RecyclerView in Kotlin Android

We have this tutorial for Java here: Display image grid in RecyclerView in Android. And now this tutorial is for Kotlin specially.

First of all if you are doing Kotlin first time in Android Studio then checkout this tutorial here: https://developer.android.com/kotlin/get-started

We use RecyclerView for this tutorial using GridLayoutManager.

Images Grid in Android
Images Grid in Kotlin Android

First of all we will create layout for this post.

<?xml version="1.0" encoding="utf-8"?>
<androidx.constraintlayout.widget.ConstraintLayout xmlns:android="http://schemas.android.com/apk/res/android"
  xmlns:app="http://schemas.android.com/apk/res-auto"
  xmlns:tools="http://schemas.android.com/tools"
  android:layout_width="match_parent"
  android:layout_height="match_parent"
  tools:context=".ImageGridKotlinActivity">

  <androidx.recyclerview.widget.RecyclerView
    android:id="@+id/rv"
    android:layout_width="0dp"
    android:layout_height="0dp"
    app:layout_constraintBottom_toBottomOf="parent"
    app:layout_constraintEnd_toEndOf="parent"
    app:layout_constraintStart_toStartOf="parent"
    app:layout_constraintTop_toTopOf="parent">

  </androidx.recyclerview.widget.RecyclerView>

</androidx.constraintlayout.widget.ConstraintLayout>

Now we create adapter which holds the ImageView which will go in the grid.

class ImageGridKotlinAdapter(private val c: Context, private val images: ArrayList<String>) :
        RecyclerView.Adapter<ImageGridKotlinAdapter.ColorViewHolder>() {


  override fun getItemCount(): Int {
    return images.size
  }

  override fun onCreateViewHolder(parent: ViewGroup, viewType: Int): ColorViewHolder {
    return ColorViewHolder(LayoutInflater.from(c).inflate(R.layout.item_grid_kotlin, parent, false))
  }

  override fun onBindViewHolder(holder: ColorViewHolder, position: Int) {
    val path = images[position]

    Picasso.get()
      .load(path)
      .resize(250, 250)
      .centerCrop()
      .into(holder.iv)

    holder.iv.setOnClickListener {
      //handle click event on image
    }
  }

  class ColorViewHolder(view: View) : RecyclerView.ViewHolder(view) {
    val iv = view.iv as ImageView
  }
}

Here I used Picasso library to display image, if you want to integrate it in your project then please check their web page: http://square.github.io/picasso/

Now we will go for the layout we used in above adapter. It just hold single ImageView.

<?xml version="1.0" encoding="utf-8"?>
<androidx.constraintlayout.widget.ConstraintLayout xmlns:android="http://schemas.android.com/apk/res/android"
  xmlns:app="http://schemas.android.com/apk/res-auto"
  android:layout_width="match_parent"
  android:layout_height="wrap_content">

  <ImageView
    android:id="@+id/iv"
    android:layout_width="0dp"
    android:layout_height="0dp"
    app:layout_constraintDimensionRatio="1:1"
    app:layout_constraintEnd_toEndOf="parent"
    app:layout_constraintStart_toStartOf="parent"
    app:layout_constraintTop_toTopOf="parent" />

</androidx.constraintlayout.widget.ConstraintLayout>

Here we use the ratio constraint on the ImageView and so that we can eliminate the use of custom square image view here. It is one of the benefit of using ConstraintLayout.

Now we set the above adapter to the RecyclerView so that our Images will be displayed in the grid manner. Here we use images from Flickr public domain. In RecyclerView, we used StaggeredGridLayoutManager which tell the RecyclerView to use the grid like layout with the number of columns provided.

val sglm = StaggeredGridLayoutManager(2, StaggeredGridLayoutManager.VERTICAL)
rv.layoutManager = sglm

val imageList = ArrayList<String>()
imageList.add("https://farm5.staticflickr.com/4403/36538794702_83fd8b63b7_c.jpg")
imageList.add("https://farm5.staticflickr.com/4354/35684440714_434610d1d6_c.jpg")
imageList.add("https://farm5.staticflickr.com/4301/35690634410_f5d0e312cb_c.jpg")
imageList.add("https://farm4.staticflickr.com/3854/32890526884_7dc068fedd_c.jpg")
imageList.add("https://farm8.staticflickr.com/7787/18143831616_a239c78056_c.jpg")
imageList.add("https://farm9.staticflickr.com/8745/16657401480_57653ac8b0_c.jpg")
imageList.add("https://farm3.staticflickr.com/2917/14144166232_44613c53c7_c.jpg")
imageList.add("https://farm8.staticflickr.com/7453/13960410788_3dd02b7a02_c.jpg")
imageList.add("https://farm1.staticflickr.com/920/29297133218_de38a7e4c8_c.jpg")
imageList.add("https://farm2.staticflickr.com/1788/42989123072_6720c9608d_c.jpg")
imageList.add("https://farm1.staticflickr.com/888/29062858008_89851766c9_c.jpg")
imageList.add("https://farm2.staticflickr.com/1731/27940806257_8067196b41_c.jpg")
imageList.add("https://farm1.staticflickr.com/884/42745897912_ff65398e38_c.jpg")
imageList.add("https://farm2.staticflickr.com/1829/27971893037_1858467f9a_c.jpg")
imageList.add("https://farm2.staticflickr.com/1822/41996470025_414452d7a0_c.jpg")
imageList.add("https://farm2.staticflickr.com/1793/42937679651_3094ebb2b9_c.jpg")
imageList.add("https://farm1.staticflickr.com/892/42078661914_b940d96992_c.jpg")
val igka = ImageGridKotlinAdapter(this, imageList)
rv.adapter = igka

Here we used AndroidX which is major improvement over the Android Support Library. You can find out more information here: https://developer.android.com/jetpack/androidx

I also introduced ConstraintLayout for the first time in this project repo. Here we eliminated the SquareImageView class that we used in Java Image GridAdapter because of ratio constraint of ConstraintLayout.

You can find the source code for this on my github repo: https://github.com/dakshbhatt21/a-computer-engineer

Please let me know if you find any issue in the above code or have any difficulty in implementing that.

Room SQLite demo with CRUD operations in Android

This post includes the complete example of how to store and retrieve data with Room SQLite database storage in Android. Actually Room provides an abstract layer over SQLite which allows us to use SQLite features very easily and in manageable way. Here you can find more information about it: https://developer.android.com/training/data-storage/room/

Now we will add Room dependencies in our module level gradle file.

implementation "android.arch.persistence.room:runtime:1.1.1"
annotationProcessor "android.arch.persistence.room:compiler:1.1.1"

Change to the latest version if available any. Sync the project and you are ready to go.

Now Room SQLite structure consists of 3 things in general.
1. Database
2. Data Access Objects
3. Entities

3. Entity
We will understand them one by one. We will start from the last one. Entity is same as the model class we have in our project which contains the contractors and getter-setter methods. It’s same as our POJO class but it also represents the entity name and columns name for our database. It acts like the database table definition which displays the table name, primary key, column names, etc.

Here is the example for the User table which we are going to use in our example.

@Entity
public class User {
  @PrimaryKey(autoGenerate = true)
  private int id;

  @ColumnInfo(name = "first_name")
  private String firstName;

  @ColumnInfo(name = "last_name")
  private String lastName;

  @ColumnInfo(name = "phone")
  private String phone;

  @ColumnInfo(name = "email")
  private String email;

  @ColumnInfo(name = "address")
  private String address;

  public int getId() {
    return id;
  }

  public void setId(int id) {
    this.id = id;
  }

  public String getFirstName() {
    return firstName;
  }

  public void setFirstName(String firstName) {
    this.firstName = firstName;
  }

  public String getLastName() {
    return lastName;
  }

  public void setLastName(String lastName) {
    this.lastName = lastName;
  }

  public String getPhone() {
    return phone;
  }

  public void setPhone(String phone) {
    this.phone = phone;
  }

  public String getEmail() {
    return email;
  }

  public void setEmail(String email) {
    this.email = email;
  }

  public String getAddress() {
    return address;
  }

  public void setAddress(String address) {
    this.address = address;
  }
}

2. Data Access Object
Now we will create an interface which act as data access object for the User entity. This DAO will communicate with the database using this entity. So basically this DAOs will handle all the queries that we fire in SQLite like insert, update, delete and read. It provides some default functionalities like insert, update, delete as well as also support the regular SQLite queries. Let’s have a look at it.

@Dao
public interface UserDao {
  @Insert
  Long insert(User u);
    
  @Query("SELECT * FROM `User` ORDER BY `id` DESC")
  List<User> getAllUsers();
    
  @Query("SELECT * FROM `User` WHERE `id` =:id")
  User getUser(int id);
    
  @Update
  void update(User u);
    
  @Delete
  void delete(User u);
}

Here as you can see the main benefit of the Room is it will tell you if you misspell any table name of column name so that you don’t have to run the app to detect the issue. It will directly throw you an error if such things happens. So the error are compile time error instead of run time error so it will save a lot of time and makes the code more cleaner and easy to maintain.

1. Database
Now we will create the database class which will contains all the entities and the DAOs from the project. It will look like this.

@Database(entities = {User.class}, version = 1, exportSchema = false)
public abstract class UserDatabase extends RoomDatabase {
  public abstract UserDao userDao();

  private static UserDatabase INSTANCE;

  public static UserDatabase getAppDatabase(Context context) {
    if (INSTANCE == null) {
      INSTANCE = Room.databaseBuilder(context.getApplicationContext(), UserDatabase.class, "user-database").build();
    }
    return INSTANCE;
  }

  public static void destroyInstance() {
    INSTANCE = null;
  }
}

You can include more that one entity and DAO in above class if you have any. In this database class we also initiate the database instance using which we can use the DAOs and perform database operations.

Now we will see the CRUD operations one by one.

1. Insert

//get the database instance
UserDatabase ud = UserDatabase.getAppDatabase(c.get());

//init the entity
User u = new User();
u.setFirstName("John");
u.setLastName("Doe");
u.setPhone("1234567890");
u.setEmail("johndoe@website.com");
u.setAddress("Unknown");

//init dao and perform operation
UserDao dao = ud.userDao();
dao.insert(u);

2. Update

//get the database instance
UserDatabase ud = UserDatabase.getAppDatabase(c.get());

//init the entity
User u = new User();
u.setId(3);
u.setFirstName("Jane");
u.setLastName("Doe");
u.setPhone("0987654321");
u.setEmail("janedoe@website.com");
u.setAddress("Unknown");

//init dao and perform operation
UserDao dao = ud.userDao();
dao.update(u);

3. Delete

//get the database instance
UserDatabase ud = UserDatabase.getAppDatabase(c.get());

//init the entity
User u = new User();
u.setId(3);
u.setFirstName("Jane");
u.setLastName("Doe");
u.setPhone("0987654321");
u.setEmail("janedoe@website.com");
u.setAddress("Unknown");

//init dao and perform operation
UserDao dao = ud.userDao();
dao.delete(u);

4. Read

//get the database instance
UserDatabase ud = UserDatabase.getAppDatabase(c.get());

//init dao and perform operation
UserDao dao = ud.userDao();
  //get all users
List<User> users = dao.getAllUsers();
  //get single user by id
User u = dao.getUser(3);

Note: Please do not perform these operations on main UI thread. Use separate thread for it like AsyncTask. Please checkout sample on github for more information.

You can checkout the whole example on my Github repo, I created the complete UI for it so it will be easy for you to understand it and use it in your projects.

Github repository link: https://github.com/dakshbhatt21/a-computer-engineer

Download image and save it to sdcard(phone storage) without any library in Android

In this post, we are going to download image from server to your phone’s local storage. Here we are not using any third party library but use “HttpURLConnection” from java.net package. So let’s get started.

download and save image sdcard without library

First we will create progress dialog to display the progress of image being downloaded. In this dialog we will show percentage and total as well as remaining size of the image being downloaded, so the user will get the idea of how much time remaining and how big is the image.

So here is the code for the ProgressDialog.

ProgressDialog pd = new ProgressDialog(DownloadImageActivity.this);
pd.setMessage("Downloading image, please wait ...");
pd.setIndeterminate(true);
pd.setProgressStyle(ProgressDialog.STYLE_HORIZONTAL);
pd.setCancelable(false);
pd.setProgressNumberFormat("%1d KB/%2d KB");

Here first we set the message “Downloading image, please wait …”, then we set the indeterminate flag to true because we do not know the size of the image at first. Then comes the progress style, it will be ProgressDialog.STYLE_HORIZONTAL. It will display the horizontal progress bar. The we set the cancelable flag to false so that user can not cancel the dialog while image is downloading. Then we set the progress number format, which will display the total size of the image and remaining size of the image. Here we display the data in kilobyte(KB) so we use the format “%1d KB/%2d KB”.

Now we will create the AsyncTask which will download the image. Here we use HttpURLConnection which is from java.net package and does not require any third party library to download image.

private class DownloadImage extends AsyncTask<String, Integer, String> {

  private Context c;

  private DownloadImage(Context c) {
    this.c = c;
  }

  @Override
  protected String doInBackground(String... sUrl) {
    InputStream is = null;
    OutputStream os = null;
    HttpURLConnection con = null;
    int length;
    try {
      URL url = new URL(sUrl[0]);
      con = (HttpURLConnection) url.openConnection();
      con.connect();

      if (con.getResponseCode() != HttpURLConnection.HTTP_OK) {
        return "HTTP CODE: " + con.getResponseCode() + " " + con.getResponseMessage();
      }

      length = con.getContentLength();

      pd.setMax(length / (1000));

      is = con.getInputStream();
      os = new FileOutputStream(Environment.getExternalStorageDirectory() + File.separator + "a-computer-engineer.jpg");

      byte data[] = new byte[4096];
      long total = 0;
      int count;
      while ((count = is.read(data)) != -1) {
        if (isCancelled()) {
          is.close();
          return null;
        }
        total += count;
        if (length > 0) {
          publishProgress((int) total);
        }
        os.write(data, 0, count);
      }
    } catch (Exception e) {
      return e.toString();
    } finally {
      try {
        if (os != null)
          os.close();
        if (is != null)
          is.close();
      } catch (IOException ioe) {
      }

      if (con != null)
        con.disconnect();
    }
    return null;
  }

  @Override
  protected void onPreExecute() {
    super.onPreExecute();
    pd.show();
  }

  @Override
  protected void onProgressUpdate(Integer... progress) {
    super.onProgressUpdate(progress);
    pd.setIndeterminate(false);
    pd.setProgress(progress[0] / 1000);
  }

  @Override
  protected void onPostExecute(String result) {
    pd.dismiss();
    if (result != null) {
      Toast.makeText(c, "Download error: " + result, Toast.LENGTH_LONG).show();
    } else {
      Toast.makeText(c, "Image downloaded successfully!", Toast.LENGTH_SHORT).show();
      Bitmap b = BitmapFactory.decodeFile(Environment.getExternalStorageDirectory() + File.separator + "a-computer-engineer.jpg");
      iv.setImageBitmap(b);
    }
  }
}

Here we open the connection of the image url and then get the input stream and content length of the image. Then we create file on our device’s storage and then write the data to its output stream. Here we also calculate how much image is downloaded and how much is remaining and update the same in the progress dialog.

We use “publishProgress” in doInBackground that invokes the method “onProgressUpdate” with the progress value and in that method we will update the progress dialog. Here we get the content length of the image using “getContentLength()” method of HttpURLConnection class which provides data in bytes. Then we divide it with 1000 to get the image size in KB. And then we start reading the data from input stream and put a counter to calculate how much data is downloaded and update it in the UI.

At the end we displayed the toast with the success message. Please make sure that you have gain the storage permission before executing the above AsyncTask.

Here is the full code for above functionality.

public class DownloadImageActivity extends AppCompatActivity {

  private ProgressDialog pd;
  private ImageView iv;

  private DownloadImage di;

  @Override
  protected void onCreate(Bundle savedInstanceState) {
    super.onCreate(savedInstanceState);
    setContentView(R.layout.activity_download_image);

    iv = findViewById(R.id.iv);

    pd = new ProgressDialog(DownloadImageActivity.this);
    pd.setMessage("Downloading image, please wait ...");
    pd.setIndeterminate(true);
    pd.setProgressStyle(ProgressDialog.STYLE_HORIZONTAL);
    pd.setCancelable(false);
    pd.setProgressNumberFormat("%1d KB/%2d KB");

    di = new DownloadImage(DownloadImageActivity.this);
    di.execute("https://images.unsplash.com/photo-1536998533868-95cde0d71742?ixlib=rb-0.3.5&ixid=eyJhcHBfaWQiOjEyMDd9&s=69a455127db97a5cc05e2d3c9c9ef245&auto=format&fit=crop&w=4000&q=80");

    pd.setOnCancelListener(new DialogInterface.OnCancelListener() {
      @Override
      public void onCancel(DialogInterface dialog) {
        di.cancel(true);
      }
    });
  }

  private class DownloadImage extends AsyncTask<String, Integer, String> {

    private Context c;

    private DownloadImage(Context c) {
      this.c = c;
    }

    @Override
    protected String doInBackground(String... sUrl) {
      InputStream is = null;
      OutputStream os = null;
      HttpURLConnection con = null;
      int length;
      try {
        URL url = new URL(sUrl[0]);
        con = (HttpURLConnection) url.openConnection();
        con.connect();

        if (con.getResponseCode() != HttpURLConnection.HTTP_OK) {
          return "HTTP CODE: " + con.getResponseCode() + " " + con.getResponseMessage();
        }

        length = con.getContentLength();

        pd.setMax(length / (1000));

        is = con.getInputStream();
        os = new FileOutputStream(Environment.getExternalStorageDirectory() + File.separator + "a-computer-engineer.jpg");

        byte data[] = new byte[4096];
        long total = 0;
        int count;
        while ((count = is.read(data)) != -1) {
          if (isCancelled()) {
            is.close();
            return null;
          }
          total += count;
          if (length > 0) {
            publishProgress((int) total);
          }
          os.write(data, 0, count);
        }
      } catch (Exception e) {
        return e.toString();
      } finally {
        try {
          if (os != null)
            os.close();
          if (is != null)
            is.close();
        } catch (IOException ioe) {
        }

        if (con != null)
          con.disconnect();
      }
      return null;
    }

    @Override
    protected void onPreExecute() {
      super.onPreExecute();
      pd.show();
    }

    @Override
    protected void onProgressUpdate(Integer... progress) {
      super.onProgressUpdate(progress);
      pd.setIndeterminate(false);
      pd.setProgress(progress[0] / 1000);
    }

    @Override
    protected void onPostExecute(String result) {
      pd.dismiss();
      if (result != null) {
        Toast.makeText(c, "Download error: " + result, Toast.LENGTH_LONG).show();
      } else {
        Toast.makeText(c, "Image downloaded successfully!", Toast.LENGTH_SHORT).show();
        Bitmap b = BitmapFactory.decodeFile(Environment.getExternalStorageDirectory() + File.separator + "a-computer-engineer.jpg");
        iv.setImageBitmap(b);
      }
    }
  }
}

If you find any problem or doubt, please mention in comments. Do not forget to share!

Download Source Code: https://github.com/dakshbhatt21/a-computer-engineer

Create PDF and save to the sdcard in Android

Create PDF file and save it to sdcard in Android

In this article, we will create PDF file of the current view and then save it to the sdcard(internal storage) as pdf file. Here we use PdfDocument (https://developer.android.com/reference/android/graphics/pdf/PdfDocument) which added from API 19(Android KitKat). So you can use it above KitKat version of Android.

First of all we will create Bitmap of the view which we want to save on the PDF file. So for that we need to get the heigh and width of the view, so here we do all the operation in the ‘onWindowFocusChanged’ method instead of ‘onCreate’ method. So the basic structure of the file will look like this.

private RelativeLayout rlContainer;

private int width, height;

@Override
protected void onCreate(Bundle savedInstanceState) {
  super.onCreate(savedInstanceState);
  setContentView(R.layout.activity_pdf);

  rlContainer = findViewById(R.id.rl_container);
}

@Override
public void onWindowFocusChanged(boolean hasFocus) {
  super.onWindowFocusChanged(hasFocus);

  width = rlContainer.getWidth();
  height = rlContainer.getHeight();
}

Here we have on RelativeLayout which contains all the elements we need to print on the PDF file. So we will initialise it in onCreate and then get its width and height in onWindowFocusChanged. If you try to get the width and height in onCreate, it will be 0 because at that time the view did not rendered on the screen. So we will use the above method for that.

Now we will create a Bitmap of that relative layout using following code. Later we will draw this Bitmap on PDF file using Canvas of the PDF file.

Bitmap b = Bitmap.createBitmap(width, height, Bitmap.Config.ARGB_8888);
Canvas c1 = new Canvas(b);
rlContainer.draw(c1);

Now we initialise PdfDocument and create pages in that PDF file. For that we use PdfDocument.Page class. If we have 5 pages in our PDF file then we have to create 5 object of PdfDocument.Page and add them to PdfDocument. Then we fetch the canvas of the PDF page and draw our Bitmap on it. Please check the code below.

PdfDocument pd = new PdfDocument();

PdfDocument.PageInfo pi = new PdfDocument.PageInfo.Builder(width, height, 1).create();
PdfDocument.Page p = pd.startPage(pi);
Canvas c = p.getCanvas();
c.drawBitmap(b, 0, 0, new Paint());
pd.finishPage(p);

pd.close();

Here we can iterate the code from line 3 to line 7 to add more pages to the PDF files. After that we need to close the PdfDocument. This will draw our bitmap to the PDF file. Now to write this PdfDocument to the file on sdcard(internal storage), we need to create a File and write PdfDocument to its OutputStream. But make sure that you write this code before closing the PdfDocument pd.close(). Here is the code for that.

try {
  //make sure you have asked for storage permission before this
  File f = new File(Environment.getExternalStorageDirectory() + File.separator + "a-computer-engineer-pdf-test.pdf");
  pd.writeTo(new FileOutputStream(f));
} catch (FileNotFoundException fnfe) {
  fnfe.printStackTrace();
} catch (IOException ioe) {
  ioe.printStackTrace();
}

pd.close();

Please make sure that before running above code, you have the storage permission granted by user otherwise you will get error. Please check for the runtime Android permission for that. Now your PDF file is saved at your provided location on your sdcard(internal storage).

Here is the full code.

private RelativeLayout rlContainer;

private int width, height;

@Override
protected void onCreate(Bundle savedInstanceState) {
  super.onCreate(savedInstanceState);
  setContentView(R.layout.activity_pdf);

  rlContainer = findViewById(R.id.rl_container);
}

@Override
public void onWindowFocusChanged(boolean hasFocus) {
  super.onWindowFocusChanged(hasFocus);

  width = rlContainer.getWidth();
  height = rlContainer.getHeight();

  Bitmap b = Bitmap.createBitmap(width, height, Bitmap.Config.ARGB_8888);
  Canvas c1 = new Canvas(b);
  rlContainer.draw(c1);

  PdfDocument pd = new PdfDocument();

  PdfDocument.PageInfo pi = new PdfDocument.PageInfo.Builder(width, height, 1).create();
  PdfDocument.Page p = pd.startPage(pi);
  Canvas c = p.getCanvas();
  c.drawBitmap(b, 0, 0, new Paint());
  pd.finishPage(p);

  try {
    //make sure you have asked for storage permission before this
    File f = new File(Environment.getExternalStorageDirectory() + File.separator + "a-computer-engineer-pdf-test.pdf");
    pd.writeTo(new FileOutputStream(f));
  } catch (FileNotFoundException fnfe) {
    fnfe.printStackTrace();
  } catch (IOException ioe) {
    ioe.printStackTrace();
  }

  pd.close();
}

If you find any problem or doubt, please mention in comments. Do not forget to share!

Download Source Code: https://github.com/dakshbhatt21/a-computer-engineer

Draw line using finger on Canvas in Android

Draw line on canvas using finger

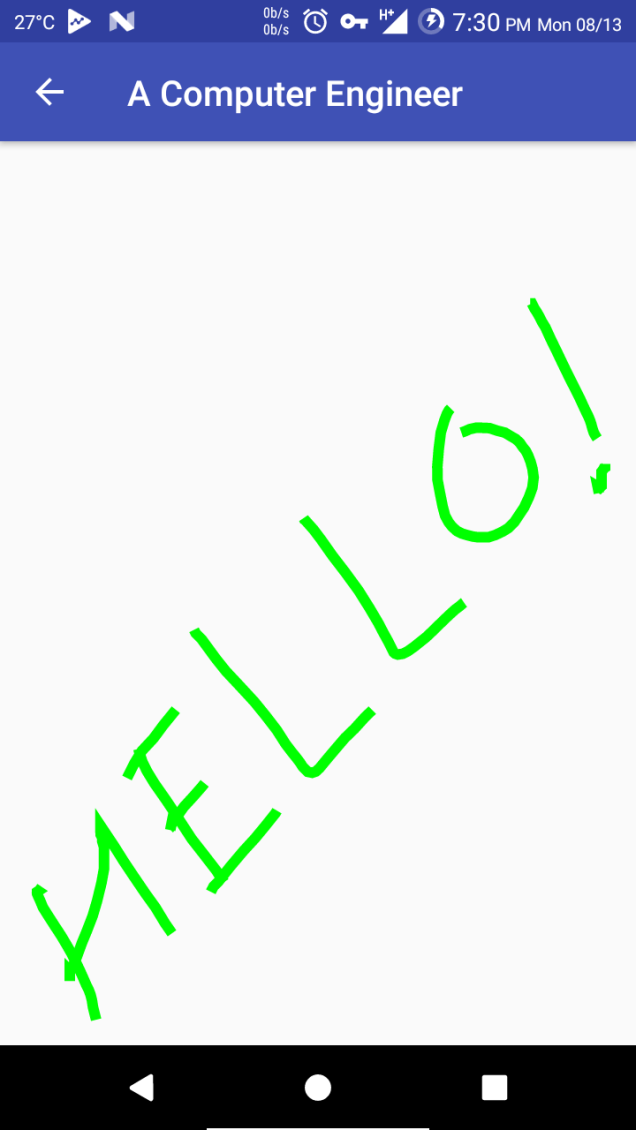
Draw line on canvas using your finger is very much important task if you are going to develop any kind of drawing app or image editing app. So in this tutorial we are going to see how one can draw on canvas using touch methods.

(Those who want to just copy paste the whole class can scroll at the end!)

First of all we create a custom view which contains the canvas and all its touch methods which performs the draw activity.

This is the class which we are going to use in XML layout. You can use it in XML like this . Here we are going to add all the initialization in the second constructor as we are going to use it in the XML file. But it is advisable if you use a common method and add it to every constructor.

public class DrawLineCanvas extends View {

  public DrawLineCanvas(Context context) {
    super(context);
  }

  public DrawLineCanvas(Context context, AttributeSet attrs) {
    super(context, attrs);
  }

  public DrawLineCanvas(Context context, AttributeSet attrs, int defStyleAttr) {
    super(context, attrs, defStyleAttr);
  }

}

Now we add few methods in the above class, each method has different purpose of its own.

This method will give us the width and height of the view that is inflated. So if we give “match_parent” in the XML file then we can get the full width and height of the view and create bitmap and canvas of that size so that we can draw on whole visible area of the screen except toolbar and status bar.

@Override
protected void onSizeChanged(int w, int h, int oldw, int oldh) {
  super.onSizeChanged(w, h, oldw, oldh);
}

Now this method will identify the touch event and draw on the bitmap accordingly. We consider three different events here. One is when user touch the screen, second when the user move his/her finger on the screen and the last one when the user lift the finger from the screen.

@Override
public boolean onTouchEvent(MotionEvent event) {

  switch (event.getAction()) {
    case MotionEvent.ACTION_DOWN:
      break;
    case MotionEvent.ACTION_MOVE:
      break;
    case MotionEvent.ACTION_UP:
      break;
    default:
      return false;
  }

  invalidate();
  return true;
}

Here “invalidate()” calls the below method so it will draw on the canvas.

The below method will draw the path(which we drew using finger) on the canvas. We will call this method every time we touch or drag finger on the screen.

@Override
protected void onDraw(Canvas canvas) {
  super.onDraw(canvas);
}

Now we initialise all the needed things to get started.

private Canvas c;

private Paint pLine, pBg;
private Path touchPath;

private Bitmap b;

public DrawLineCanvas(Context context, AttributeSet attrs) {
  super(context, attrs);

  pBg = new Paint();
  pBg.setColor(Color.WHITE);

  pLine = new Paint();
  pLine.setColor(Color.GREEN);
  pLine.setAntiAlias(true);
  pLine.setStyle(Paint.Style.STROKE);
  pLine.setStrokeWidth(12);

  touchPath = new Path();
}

@Override
protected void onSizeChanged(int w, int h, int oldw, int oldh) {
  super.onSizeChanged(w, h, oldw, oldh);
  b = Bitmap.createBitmap(w, h, Bitmap.Config.ARGB_8888);
  c = new Canvas(b);
}

Here Canvas is used to save the drawing when we lift the finger and started drawing again. Paint is for line that is being drawn and the background on which the line is being drawn. It includes the line size, color, stroke, etc. Path is for saving the path that we create by moving our finger on the screen. So when we lift the finger we will draw this path to our canvas and it will be drawn on the screen. And lastly the Bitmap is used to initialise our canvas with the size we are getting from the view inflated in the XML using method onSizeChanged().

Now comes the drawing part, now we will identify the touch event and save it to the “touchPath” we initialised so that we can draw it to the canvas once we lift the finger. On every action event, we also calls the “invalidate()” method so that your current moving path will be drawn on the canvas.

@Override
public boolean onTouchEvent(MotionEvent event) {

  float touchX = event.getX();
  float touchY = event.getY();
  switch (event.getAction()) {
    case MotionEvent.ACTION_DOWN:
      touchPath.moveTo(touchX, touchY);
      break;
    case MotionEvent.ACTION_MOVE:
      touchPath.lineTo(touchX, touchY);
      break;
    case MotionEvent.ACTION_UP:
      touchPath.lineTo(touchX, touchY);
      c.drawPath(touchPath, pLine);
      touchPath = new Path();
      break;
    default:
      return false;
  }

  invalidate();
  return true;
}

Here in “ACTION_UP” event we draw the path “touchPath” to the Canvas c and reset the path so you can start new line when you again start drawing something.

Now finally the “onDraw()” method which will draw everything on canvas and you can see your drawing on screen!

@Override
protected void onDraw(Canvas canvas) {
  super.onDraw(canvas);

  canvas.drawBitmap(b, 0, 0, pBg);
  canvas.drawPath(touchPath, pLine);
}

The complete class looks like this.

public class DrawLineCanvas extends View {

  private Canvas c;

  private Paint pLine, pBg;
  private Path touchPath;

  private Bitmap b;

  public DrawLineCanvas(Context context) {
    super(context);
  }

  public DrawLineCanvas(Context context, AttributeSet attrs) {
    super(context, attrs);

    pBg = new Paint();
    pBg.setColor(Color.WHITE);

    pLine = new Paint();
    pLine.setColor(Color.GREEN);
    pLine.setAntiAlias(true);
    pLine.setStyle(Paint.Style.STROKE);
    pLine.setStrokeWidth(12);

    touchPath = new Path();
  }

  public DrawLineCanvas(Context context, AttributeSet attrs, int defStyleAttr) {
    super(context, attrs, defStyleAttr);
  }

  @Override
  protected void onSizeChanged(int w, int h, int oldw, int oldh) {
    super.onSizeChanged(w, h, oldw, oldh);
    b = Bitmap.createBitmap(w, h, Bitmap.Config.ARGB_8888);
    c = new Canvas(b);
  }
  
  @Override
  public boolean onTouchEvent(MotionEvent event) {

    float touchX = event.getX();
    float touchY = event.getY();
    switch (event.getAction()) {
      case MotionEvent.ACTION_DOWN:
        touchPath.moveTo(touchX, touchY);
        break;
      case MotionEvent.ACTION_MOVE:
        touchPath.lineTo(touchX, touchY);
        break;
      case MotionEvent.ACTION_UP:
        touchPath.lineTo(touchX, touchY);
        c.drawPath(touchPath, pLine);
        touchPath = new Path();
        break;
      default:
        return false;
    }

    invalidate();
    return true;
  }

  @Override
  protected void onDraw(Canvas canvas) {
    super.onDraw(canvas);

    canvas.drawBitmap(b, 0, 0, pBg);
    canvas.drawPath(touchPath, pLine);
  }
}

To save this canvas as image on your sdcard, please check my other post here: https://acomputerengineer.wordpress.com/2015/01/13/how-to-draw-canvas-on-imageview-and-save-canvas-as-bitmap-and-store-in-sdcard-in-android/

For source code, please checkout my Github repo here: https://github.com/dakshbhatt21/a-computer-engineer

Display List in AlertDialog in Android(Simple List, Radio Button List, Check Box List)

You don’t need to create custom view to display list in your AlertDialog. AlertDialog has the ability to display different kind of lists itself. Here we will see the 3 different types of methods to display the list in AlertDialog.

1. Simple List
Here we will display simple list in the AlertDialog. Here we need to provide the array of String to the AlertDialog and that’s it, it will handle the rest. We can also add Ok/Cancel button to the list but we won’t need it in the simple list.
We can use this list dialog in place of dropdown list(spinner).

First we declare the String array and then we create the AlertDialog.

String[] listItems = {"one", "two", "three", "four", "five"};

AlertDialog.Builder builder = new AlertDialog.Builder(ListAlertDialogActivity.this);
builder.setTitle("Choose item");

builder.setItems(listItems, new DialogInterface.OnClickListener() {
  @Override
  public void onClick(DialogInterface dialog, int which) {
    Toast.makeText(ListAlertDialogActivity.this, "Position: " + which + " Value: " + listItems[which], Toast.LENGTH_LONG).show();
  }
});

AlertDialog dialog = builder.create();
dialog.show();

The above code will display the list in the dialog like this.

Simple List in AlertDialog

2. Radio Button List
Now we will display list with Radio Button in the AlertDialog. You can use such list when you want to select only 1 item from the list of items. This is similar to the first one in the functionality but the visual representation is different. Here we will add positive button(OK/Done) to confirm the selection once the user select his/her option via Radio Button. Here we use the same String array as previous one.
We can use this list dialog in place of dropdown list(spinner).

String[] listItems = {"one", "two", "three", "four", "five"};

AlertDialog.Builder builder = new AlertDialog.Builder(ListAlertDialogActivity.this);
builder.setTitle("Choose item");

int checkedItem = 0; //this will checked the item when user open the dialog
builder.setSingleChoiceItems(listItems, checkedItem, new DialogInterface.OnClickListener() {
  @Override
  public void onClick(DialogInterface dialog, int which) {
    Toast.makeText(ListAlertDialogActivity.this, "Position: " + which + " Value: " + listItems[which], Toast.LENGTH_LONG).show();
  }
});

builder.setPositiveButton("Done", new DialogInterface.OnClickListener() {
  @Override
  public void onClick(DialogInterface dialog, int which) {
    dialog.dismiss();
  }
});

AlertDialog dialog = builder.create();
dialog.show();

The above code will display the list in the dialog with radio button like this.

Radio Button List in AlertDialog

3. Check Box List
This list is very important as we are going to select multiple items from the list using checkbox. We can use this list in many project where you want to select multiple items. Here we need to add confirmation button(OK/Done) after user selects all the items he/she wants. Here we use the same String array as previous one.
We can also call this a multi-select list or multi select dropdown list.

String[] listItems = {"one", "two", "three", "four", "five"};

AlertDialog.Builder builder = new AlertDialog.Builder(ListAlertDialogActivity.this);
builder.setTitle("Choose items");

boolean[] checkedItems = new boolean[]{true, false, true, false, true}; //this will checked the items when user open the dialog
builder.setMultiChoiceItems(listItems, checkedItems, new DialogInterface.OnMultiChoiceClickListener() {
  @Override
  public void onClick(DialogInterface dialog, int which, boolean isChecked) {
    Toast.makeText(ListAlertDialogActivity.this, "Position: " + which + " Value: " + listItems[which] + " State: " + (isChecked ? "checked" : "unchecked"), Toast.LENGTH_LONG).show();
  }
});

builder.setPositiveButton("Done", new DialogInterface.OnClickListener() {
  @Override
  public void onClick(DialogInterface dialog, int which) {
    dialog.dismiss();
  }
});

AlertDialog dialog = builder.create();
dialog.show();

The above code will display the list in the dialog with radio button like this.

Check Box List in AlertDialog

You can find the source code for this on my github repo: https://github.com/dakshbhatt21/a-computer-engineer